


18 July 2023 Update: Heads Up!
I’m not going to go into detail on it, but I’m working with another tuner right now. I blew a LOT of time troubleshooting the tune I got from ECU Tuning Kaunas and wasn’t satisfied with the replies I received from my enquiries about what the causes might be. I’m admitting a mistake on my part and moving on. So, for your information, I cannot recommend ECU Tuning Kaunas for parts or tuning.
With that said:
The original posting and video are still useful to see how the instrumentation was added to get my boost/EGT gauge set up.
I don’t recommend that anybody disassembles turbos this way, or even removes the actuators. They are calibrated by whoever assembles the turbos and even Garrett and Hella will say not to even loosen the bolts, as these turbos are sensitive to slight movements of the actuator. This will apparently throw them out of calibration.
From here, I’m leaving the rest of the article in its original condition.
Thanks!
—Mark-A-Billy
18 July 2023 Update: Heads Up!
I’m not going to go into detail on it, but I’m working with another tuner right now. I blew a LOT of time troubleshooting the tune I got from ECU Tuning Kaunas and wasn’t satisfied with the replies I received from my enquiries about what the causes might be. I’m admitting a mistake on my part and moving on. So, for your information, I cannot recommend ECU Tuning Kaunas for parts or tuning.
What Are We Covering?
In the video I share the hybrid turbo I purchased from ECU Tuning Kaunas and the approach I took to add a boost / EGT gauge, where I tapped the intake and exhaust for the measurements, and how I routed the cables.
Where Has Mark-A-Billy Been?
I really ought to be getting more content out to everybody, but Evonne the Turbodiesel is finally coming together in a way that will allow me to turn it into a daily driver very soon. Recent work has been the final stretch…
Some of my biggest struggles were with paint, believe it or not. I’m not good at that and I didn’t start off by making the right investment in equipment. If I started that process over, I’d look at different equipment and possibly a better source for the paint. However, I’m really NOT a bodywork guy. The excessive orange peel on my paintwork will be noticed in the videos, but at least the car has paint on it!
I have collected a LOT of video on non-paint efforts where I can share more expertise and/or what I’ve learned along the way. Editing hours and hours of video footage to make a 10-15 minute video is a LOT of work, though, and I have to squeeze that in alongside the duties of a demanding day-job, taking care of my family’s needs, and even chairing a local party affiliate. Time is tight! If you’d like to see more focus on these efforts, consider becoming a paid subscriber and I promise to make it worth every dime!
The Hybrid Turbo
I bought my turbo from ECU Tuning Kaunas for a price lower than I’d wind up paying for an OEM turbo in new condition. The point of a hybrid is that the externals remain compact and it bolts up to the stock intake and exhaust without any need to fabricate or modify anything. This turbo has a lot of benefit in being proven to produce up to 400 hp while sticking to relatively small wheels that allow for a quick spool. This is important to driveability and results in great responsiveness, rather than just peak figures.
Incidentally, they just posted a video of their own, sharing the assembly, testing, and calibration that they perform on these turbos. Check it out!
In the video I disassemble the ECU Tuning Kaunas hybrid turbo and take some measurements. The exhaust measurements are difficult to accurately measure, because the number of turbine blades is odd. I can’t measure tip-to-tip. I also have to admit that I probably wasn’t measuring the right dimensions, as I probably should have measured across the middle of the turbine blades, rather than at the base, which is why the 68.2mm measurement in the table below is so huge.
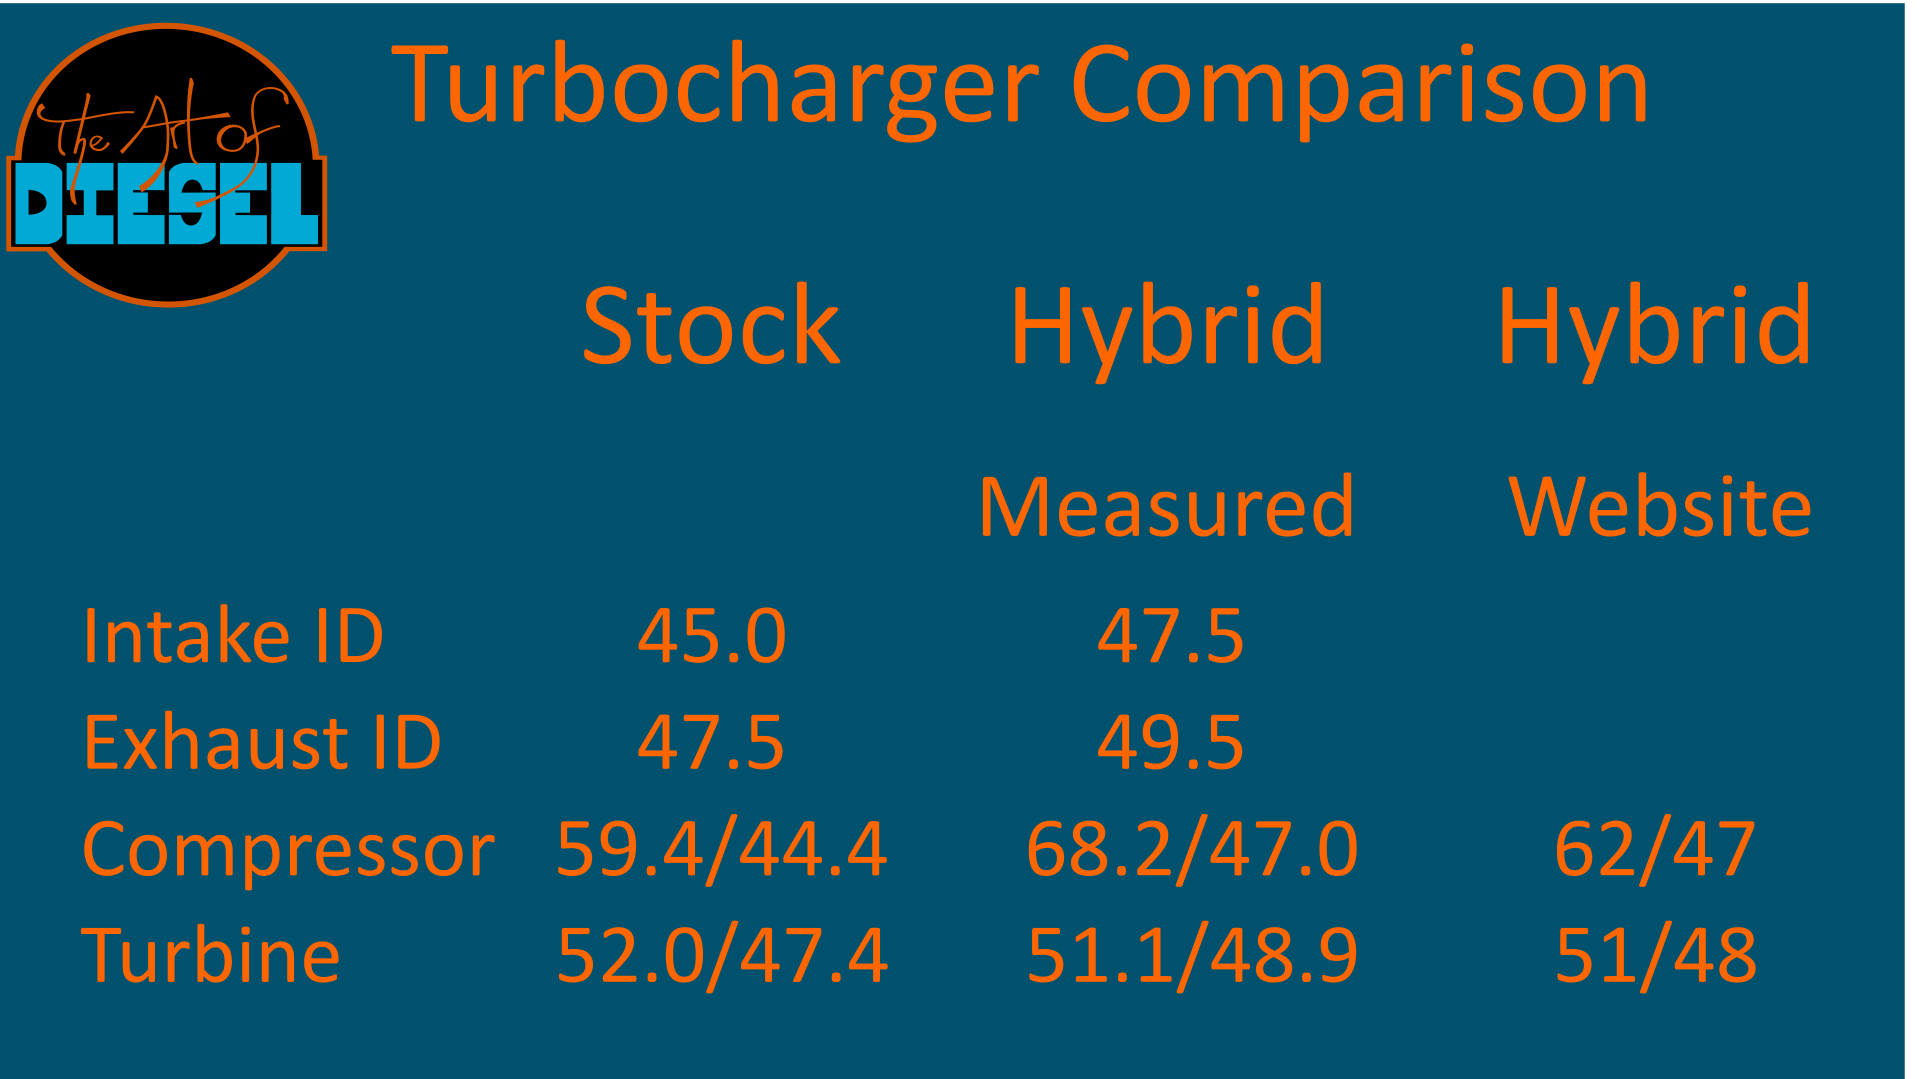
The important thing to do with these figures is to see that the differences are actually quite small between their hybrid and the stock turbo. Compare these figures with the hybrid turbo that Darkside Developments used to make for these cars (I don’t see it on their site, anymore, I assume it was discontinued). This turbo was used by Alex on his Legit Street Cars channel on YouTube and my notes show the following measurements on this one:
Compressor 73/54mm
Turbine 58/54mm
This setup is much larger than ECU Tuning Kaunas’ one and positively huge compared with the stock unit. However, if the hybrid they are selling can provide up to 400 hp without destroying itself, then why would I want to pay more than twice as much and wind up with larger wheels that take longer to spool?
Gauge, Sensors, and Cable Routing
I chose to buy an inexpensive MotorMeter gauge on eBay and later realized that the REAL brand name that people look for is AutoMeter. Rookie mistake! If I had spent a bit more and purchased the AutoMeter gauge I wound have found one with EGT in Fahrenheit, but this one is in Celsius instead. While people normally have to watch out for temperatures going above 1200F, I’ll simply be watching for anything in excess of 650C.
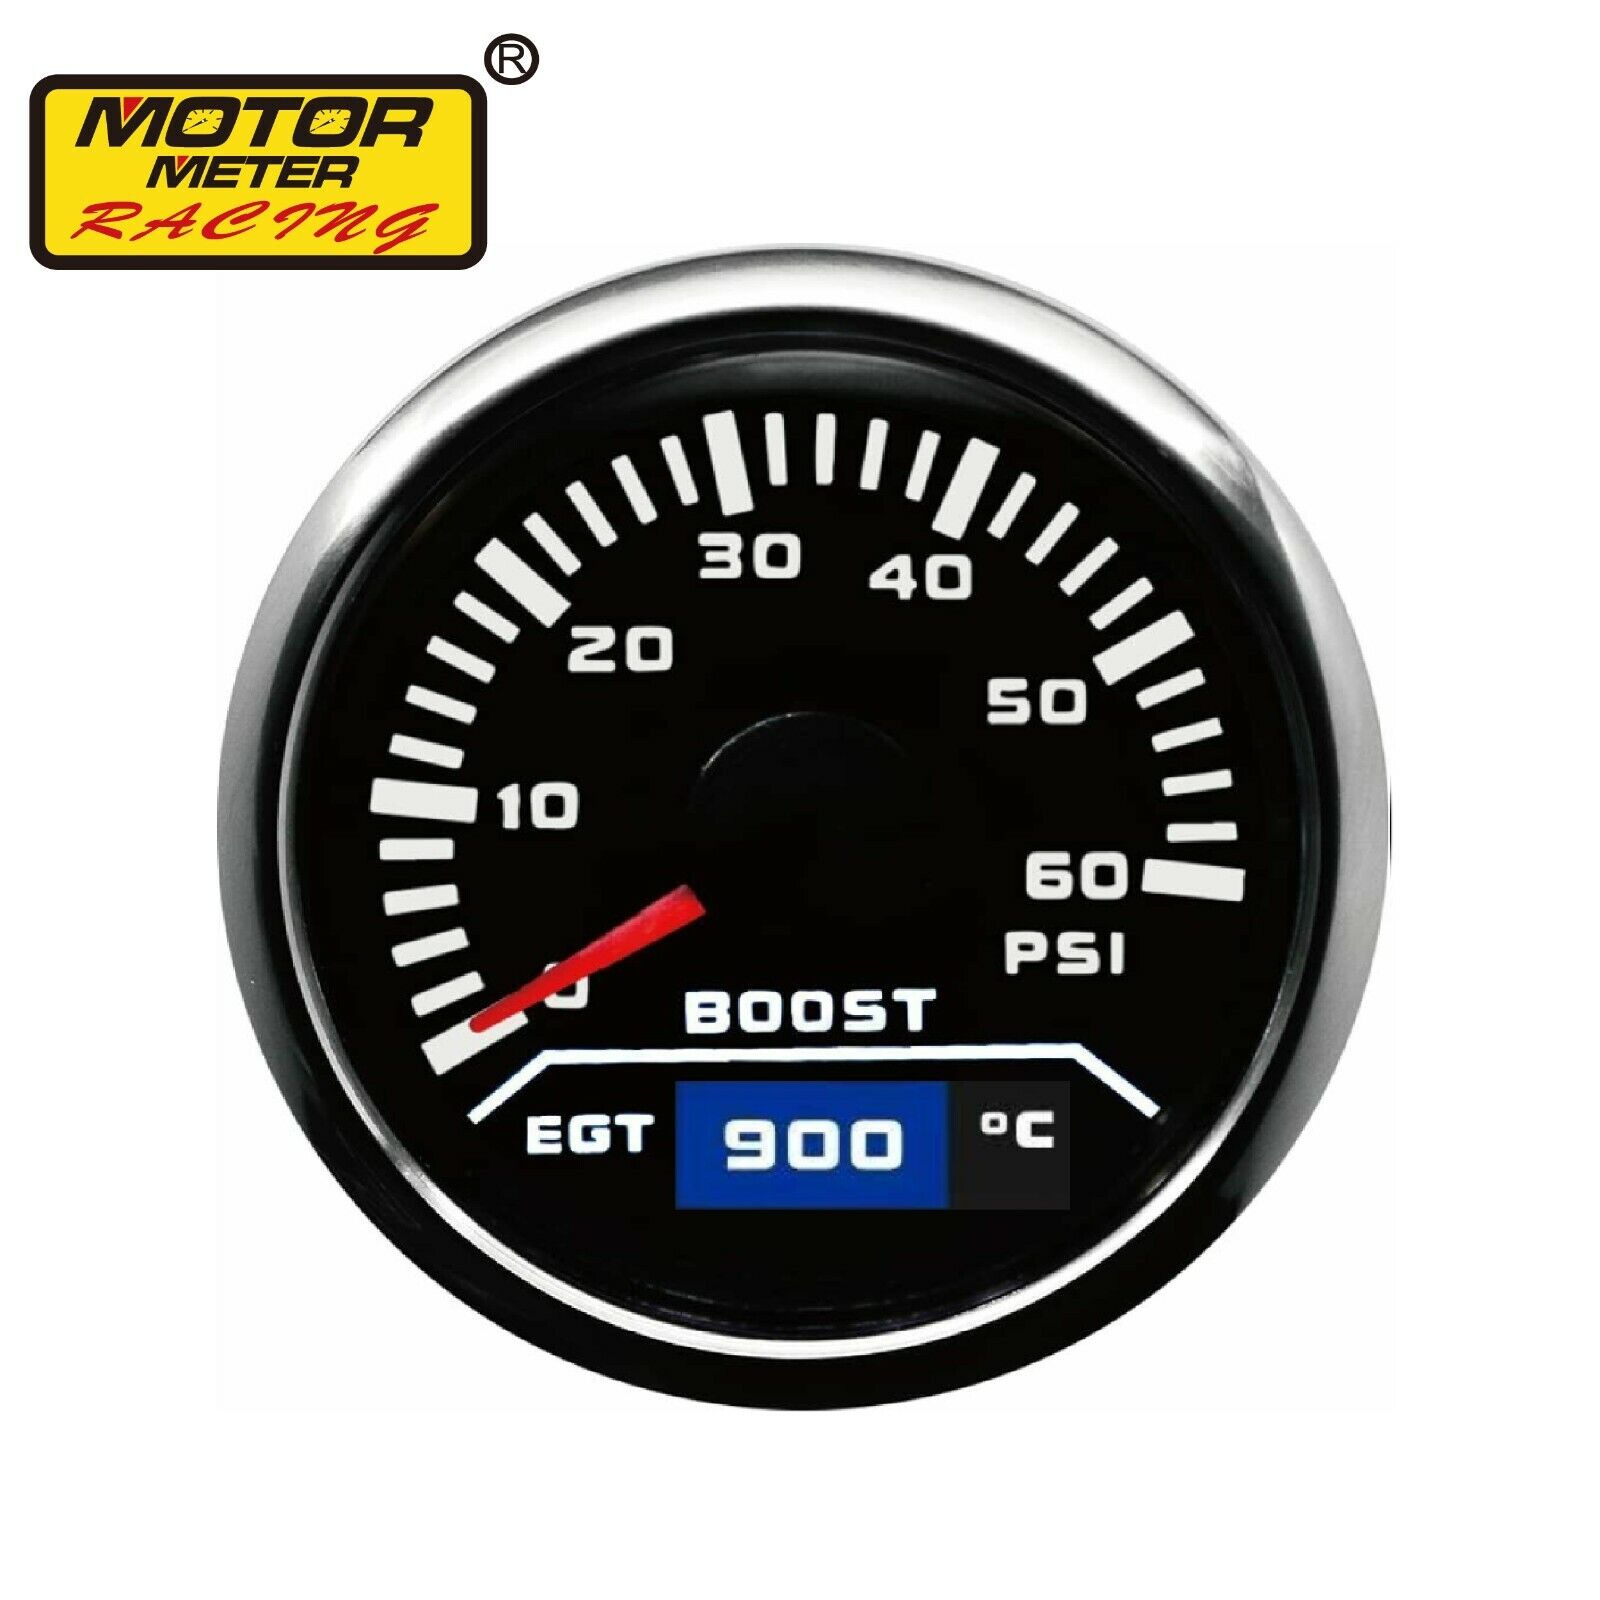
As seen in the video, the gauge looks good on my dash and as a 52mm gauge it isn’t taking over the world or blocking my view of the road ahead. The basic black, white, and chrome also matches the gauges in my instrument cluster, so it’s a good pick taste-wise.
In the video I show how I drilled and tapped the mixer tube leading to the intake manifold where the EGR mixer used to be. That’s where I brazed in an aluminum plug and there was plenty of material to safely tap into. The MAP sensor is actually on the other side of that same tube, so I’m checking pressure very close to where the ECU does it. Of course I did this with that tube on a workbench so that I could clean out any chips from my drilling, tapping, and deburring operations.

I also show where I installed the EGT thermocouple into the exhaust manifold just upstream of the turbo. This is the correct location to check temperatures, as the turbo will pull energy from the exhaust (to turn the compressor) and the temperatures after the turbo will be significantly lower. This was done before the turbo was installed so that I could vacuum out any chips that might be left in the exhaust manifold.

I found a convenient place to pass the boost and EGT cables through the firewall just behind the brake fluid reservoir. To access it I removed the windshield wipers and the cowling below them. I wasn’t sure what I’d find under there, but I was pleasantly surprised to see a rubber plug in that location that I removed, drilled out, and used as a grommet to get the cables into the car’s interior. Given the pinched-off tube at the back of the reservoir, I believe that cars with standard transmissions would use this location to mount a hydraulic clutch master cylinder.
I was able to easily remove the covers under the dash and pass the cables to the instrument cluster’s space. The instrument cluster is also very easy to remove. I chose to mount the gauge just above and to the right of the instrument cluster. I screwed down the pod and drilled a hole for the cables to pass through.
After mounting the pod and installing the gauge inside of it, I ran the cables down to the instrument cluster’s space in the dash and put some convoluted tubing around it for appearance’s sake.
From there, it was mostly a job of matching up the wires and connecting them to each other. However, I did need a ground and a switched 12V power source that I found at the instrument cluster’s connector. Pin 1 is the ground (brown) while Pin 6 is the switched 12V source (black). I found a source online for this information, but I reconnected the battery and checked these connections before tapping into the wires with Scotchlok-type connectors. In the video I show a trick in popping the connector apart so that you can easily see which wire goes to which pin.

With that completed, I was able to reinstall the instrument cluster and power things up for the first time. I could see the EGTs rising after starting the engine, but boost won’t really be produced with the car in neutral sitting still. I’ll be getting measurements on how the car is behaving and sharing those soon.

Wrapping Up
I have a lot more video to produce content from, including mods to the exhaust and my experiences with almost comically crappy aftermarket headlights. Please come back soon for more! Please comment, as I’d like to hear from readers and viewers of my materials. I learn a lot from comments, too!
Thanks for reading!
—Mark-A-Billy

Share this post